Manufacturers offer a huge selection of polystyrene tiles for ceiling decoration. Whichever one you choose for installation, be sure to check its quality when buying:
- The density of the material must be uniform over the entire surface;
- The edges of each of the tiles must be smooth, without splinters;
- The drawing (or relief, if any) must be free from defects;
- Ceiling tiles should not differ in color shade.
Materials and tools necessary for installing tiles on the ceiling
Materials:
-
 ceiling tiles,
 - glue,
- primer,
- putty.
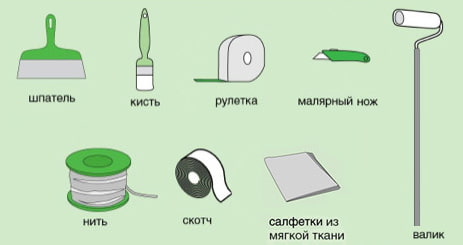 Instruments:
- metal spatula,
- brush,
- roulette,
- rope or strong thread,
- masking tape,
- painting knife,
- roller,
- cloth napkins.
Preparation for gluing ceiling tiles
Before installing the tiles on the ceiling, prepare the surface to which you will attach them. Since the weight of each ceiling tile is very light, it does not require strong adhesion to the ceiling surface. But if whitewash remains on it, it is better to eliminate its remnants, otherwise, over time, the tile may fly off. It is also better to remove too large irregularities. This is done in the following order:
- Scrape off any remaining whitewash or other coating with a metal spatula;

- Apply a thin layer of putty to the cleaned surface, let it dry;

- Using a brush, apply a primer over the filler. Usually, PVA glue diluted to the desired consistency is used.

Marking before installing ceiling tiles
There are two ways to lay tiles on the ceiling:
- parallel to the walls,
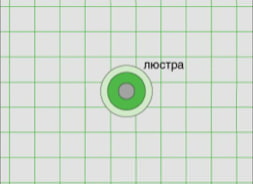
- diagonally to them.
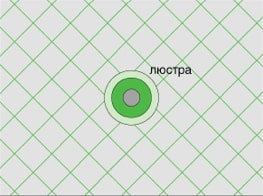
In the first method, the edges of the tiles are directed parallel to the walls, in the second - at an angle. Which gluing method to choose depends on the size of the room, its geometry, as well as the type of ceiling covering. If the room is long and narrow, it is better to choose a diagonal laying direction, this technique will visually slightly change the unfortunate proportions.
Advice: If the room is large, a diagonal arrangement of the tiles will look more advantageous than a parallel one. In large, square rooms, both methods can be used.
Installation of tiles on the ceiling can also be carried out in different ways:
- from the chandelier (from the center of the ceiling),
- from the corner of the room.
Diagonal laying, as a rule, starts from the center, and parallel laying can be done in both ways. Both the marking and the installation of the ceiling tile itself are somewhat different in both versions.
Installation of tiles on the ceiling from the center
For marking in the center of the ceiling, draw 2 lines perpendicular to each other, each of which is parallel to the wall. This can be done with threads and tape. Thus, on the marking, 4 right angles are formed at one point.
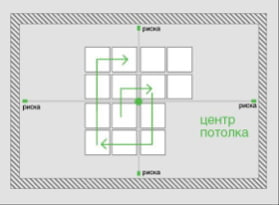
For the diagonal method of gluing the ceiling tiles, the right angles must be divided in half (45 degrees each), and the marking lines must be laid along their diagonals. This is done if the room is square.
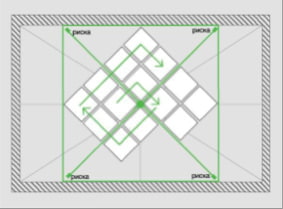
If its shape is closer to rectangular, we markup for diagonal installation of ceiling tiles as follows:
- We connect the corners of the room with diagonals;
- Draw 2 lines parallel to the walls through the intersection point;
- Divide the resulting 4 right angles by diagonals and draw marking lines along them.
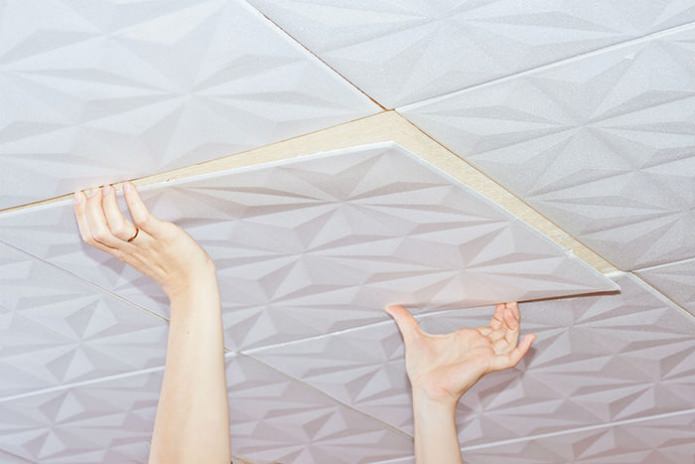
When gluing ceiling tiles, glue is applied to each of the tiles immediately before installation, you do not need to do this in advance. After applying glue, the ceiling tile is firmly pressed to the surface, held for several minutes, then released and proceeded to apply glue to the next tile.
The procedure for gluing:
-
 The corner of the first tile when gluing the tiles to the ceiling is laid exactly in the center, and then the markings are followed.
 - The first four tiles on the ceiling are laid out in marked squares, trying to do this as accurately as possible.
- Tiles in the corners and near the walls are cut to size using a paint knife.
- The cracks formed at the joints are filled with acrylic sealant.
Installation of ceiling tiles from the corner
Ceiling marking in this case starts from the corner of the room, which is called "base". This is usually the angle that is best seen when entering. One of the walls in this corner is also called the "base" wall, usually the longer wall (in a rectangular room).
To mark in both corners of the base wall, we retreat from it by the size of the tile plus one centimeter for the gap and put marks there. Pull the thread between the marks and fix it with tape. Thus, a marking guide line is obtained, along which we begin installation. The gluing is carried out not from the first, but from the second tile, since the first is fixed with adhesive tape, which interferes with work.
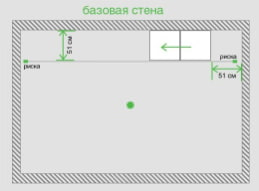
Important: When installing ceiling tiles, do not neglect the markings! There are no absolutely straight walls, in the middle of work you may find yourself in a situation where nothing can be fixed: a wide gap forms between the tiles and the wall.
The procedure for gluing:
- Apply glue to the tiles (it is enough to apply a small amount of glue to the center of the ceiling tile and at its corners);
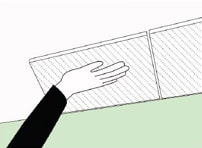
- Place the tile back in place, press and hold for a few minutes;
- If the adhesive protrudes beyond the edges during installation, remove it immediately with a soft, clean cloth;
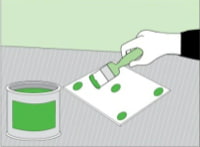
- Glue ceiling tiles in successive rows;
- Cut the tiles in the last row to size with a painting knife;
- If, during installation, small gaps form between the tiles on the ceiling, cover them with sealant.

 10 practical tips for arranging a small kitchen in the country
 12 simple ideas for a small garden that will make it visually spacious

 What is better not to do it yourself during the repair?
 Bloated linoleum: how to fix it without disassembly
 The worst decisions in apartment renovation
  How to glue a ceiling plinth to a stretch ceiling?
 Ceiling plinth for stretch ceiling: types, recommendations for selection
 How to choose a screwdriver for your home?